Advanced UR
Warning
Before connecting IO, turn the robot off and disconnect the power. Wait a minute for any charge to dissipate. Or risk the unfortunate fate of being human toast.
Warning
If we wear out the IO connections by abusing them, I will be a very sad panda.
Note
You can store your installation as you store a program. Changes to the default installation will be deleted.
Theme
External E-stop
Digital IO for program flow
Relative waypoints
Built-in functions
Templates
Machine tending
Equipment
UR5 / UR5e robot with PolyScope (they are different, old/new).
Robotiq 2-Finger Adaptive Robot Gripper / Hand-E Gripper
Lab station with
E-stop, box with red button and 2 sets of wiring
Workpiece holder
Stack of workpieces
Big box with sliding door.
Before the lab
Complete the Universal Robots Academy *<– this is very important!*
“3. Setting up a tool”
“7. Safety settings”
“9. Program Flow”
“10. Feature Coordinates”
Try to get together in a group of 2-4 people, plz.
Top tip for preparing: Use the offline simulator from UR. For the ambitious; do all your programming in the simulator, bring your saved program to the lab, bridge the simulation gap, success!
Report
There is no need to hand in a report after this lab.
Signed attendance will suffice as approved lab exercise.
Tasks
Connect and test E-stop
The UR cabinet is ready for the E-stop to be connected using a screwdriver. The E-stop IO’s in the cabinet are all connected by short-wires, giving the E-stop inputs high signals at all times. If, for any reason, this voltage goes away, an emergency stop is triggered just as when using the E-stop on the pendant.
The new E-stop contains 2 NC switches. If the red button is pressed, the switches are opened, breaking the circuits.
Shutdown the robot
Disconnect power
Wait a minute
Connect the new E-stop
Fire up the robot again and verify that all E-stops work
Connect Control box digital IO’s, test IO’s
You will connect a total of 4 digital inputs to the UR, from the control box.
Shutdown the robot
Disconnect power
Wait a minute
Make the necessary connections to connect buttons and indicators to digital I/O.
Fire up the robot again
Test and name the inputs
Elements of the Work Station

Door_open sensor
Door_close sensor
Workpiece_sensor
Clamp servo
Ready_LED and busy_LED
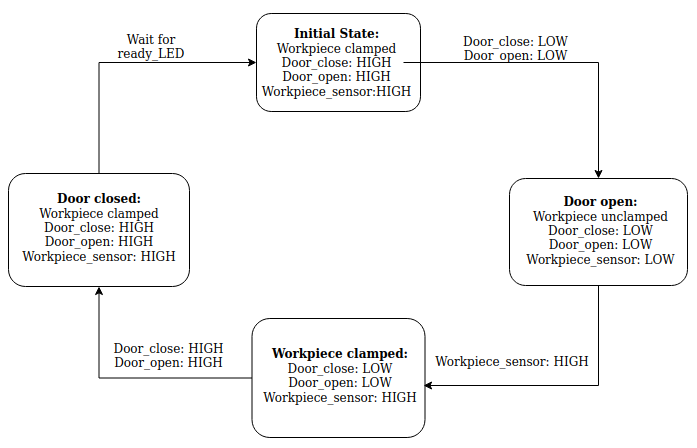
Finite-State Sequence of the Machine Tending Box
Set the machine to its initial state when starting up.
Make a program to open the machine door
Make a program to open the machine door. This might sound easier than it is. Feel free to fasten the box. Consider using force control.
Make a program to close the machine door
Make a program to close the machine door. Same as above, but close.
Make a program to pick up a workpiece
Make a program to pick a workpiece. There are several ways to this. Consider the following suggestion as a starting point:
Move to a waypoint above the workpiece.
Close gripper.
Lower slowly relative to the waypoint above, until workpiece is detected.
Relative move up 1 cm.
Open gripper.
Move to position.
Pick workpiece.
The direction option can be used to detect an object on contact and perform an action. Also, have a look at stack/de-stack options on the UR5e.
It is also possible to detect the force applied to the gripper on contact, with pre-built functions. Have a look at them!
Tip: my_variable = get_actual_tcp_pose() and add 0.01 meters to the Z index [2], then MoveL to this variable position.
Make a program to place a workpiece in the work station
Make a program to place a workpiece in the work station. Try to be as accurate as possible when placing the workpiece!
Make a program to place workpieces in a grid
Make a program to place the workpieces in a grid. There are several ways to this. Consider the following suggestion as a starting point:
Make a waypoint at a corner of your grid.
Make a counter, row_num.
Increment counter each time a box is picked from machine.
Offset placement waypoints by using row_num.
Add col_num to the mix.
Also, take a look at palletize/de-palletize options on the UR5e for the built-in template.
Combine everything to a complete machine tending program
Using the above programs as subprograms or copy/paste source, make a program to open the door, fetch the workpiece, place them in a grid, feed the machine a new workpiece and close the door. Wait until its finished. And repeat. One workpiece at a time.

Voilà! Kick your feet up and let the robot do all the work!
Questions
The E-stop has 2 NC switches. Why?
How many tasks did you complete? What kept you from completing everything?
If the robot or the “CNC” changed location, how would you update the program?
What are the pros and cons between cobots and industrial robots?
Discuss how cobots can be applied to enhance workflow for a company, or in everyday life.
Does the configuration of the robot affect the applied force when opening/closing the door?
Did you remember to have fun?